Saturday 31 March 2012

The Land of the Half-Finished!!

Happy weekend!! I am rather excited today, as it is my first market day :)

I had this long list of "would be nice if I managed to get it finished by the markets" items, and I am slowly making my way through them. Here's a sample of the list:
  • 3 half-made journal covers
  • my brooch from the *washing day* set
  • half-made adult-sized apron to go with the kid's apron
  • custom order for my friend Rach, to use as an example of name hoop art
  • 2 more gadget cases in different designs that I already have cut out and partially sewn
  • another cloud brooch, to replace the one I sold
  • the bunting with my shop name for my stall banner, it is also cut out waiting for me to do millions of applique and sewing
  • the tablecloth for my stall - seems I will just use the calico unhemmed and unembellished
  • business cards
  • more display cards, like these here
Oh dear. That's the list I woke up to this morning. Of course, it is impossible to get them all done, so I have had to prioritise. I have made it through several of them, suspended several until after the markets, and still have a few in progress. 


I have not been stressed, though. I totally want to keep this as something fun, not stressful. I started to feel a little lost and overwhelmed, but immediately had a little thought pop into my head: "You were going to aim for about thirty items. Count the finished ones now." (Thanks for that, God!) Guess how many I have completed and ready for sale so far? TWENTY-NINE! So I just have to complete one more item and I am on target. Aaaaaahhh...that's nice to know :)

Thursday 29 March 2012

Kids' Drawings Into Wall Art

Can you believe it is almost the weekend again? The time is going way too fast. My daughter put herself to bed a couple hours early today, after getting home from an outing. Thankfully, the little man was also ready for bed soon after, and I had a lovely couple of hours doing some needlework. 

My gorgeous niece (my only niece so far!) is a wonderful at drawing. She is three and a half, and comes up with the most amazing pictures. I love them. I have been blessed to receive some of her drawings in the mail, and some others via my sister who put them away for me (thanks, Kirsty!). 

I  have been wanting to do this for ages (I say that about so many projects because it's true!!!). To transfer her drawing into embroidered wall art. And here it is:

The original drawing
The finished wall art version.

The embroidery hoop is only 10cm, so the photo of it on my screen is slightly larger than the actual size! I think it would look really cute to hang several of these embroidered children's drawings together in a cluster on one wall. What do you think?

Wednesday 28 March 2012

Kids' Oilcloth Aprons


Today has been a shocker. I will spare you the details, as it is like something out of a B-grade PG comedy involving children and their bodily functions. Not to mention the kitchen disasters. And trying to juggle five activities at once, and the chaos that ensues.

Anyway. One thing that has gone right today is my attempt at a kids' apron out of oilcloth, bias binding and cotton twill tape. A friend has put in an order for matching aprons for mother and child. This is the style I am planning on making, as clothing protection is the number one priority. Oilcloth is great, because you can just wipe it clean.


Cute little model, isn't she. As my Mum always says, "God made them cute for a reason." Today is another example of why. ;)

Tuesday 27 March 2012

A Glimpse of My Latest Project - *Washing Day*

This idea has been brewing for a while now. It began almost two months ago. I have been itching to give it a shot, but also scared that it would not turn out like I have it in my head! Do you ever get that? But I'm happy to say, this time, it is shaping up nicely!! Especially considering that this is my first time to attempt to use chain and jump rings...

So...it's washing day!! Remember my Quiet Book dress up doll page?  Well, the inspiration for this little statement necklace and brooch set came out of that. I loved making the little 50s style dresses out of wool felt and embroidery, and the idea just popped into my head and I haven't been able to shake it since.


I have not actually sewn the yellow dress yet, just cut out the pieces. It is going to have a cute little peter pan collar. What do you think of the *washing day* concept?


Now here's the punchline...I have a little doll outline waiting to be made into a brooch, with a little dress like the one below to go on the doll. The dresses will all have the soft side of velcro on them, and the doll will have the scratchy side, and...you guessed it! You can change the doll's outfits!! Hurray!! I just get so excited about this idea. 


Now I know this is not for everyone, it's a bit too out there for some of you. But what about you mummies with little girls? Or aunties with nieces? Is this not a totally cute idea for a piece of jewellery that can also be a fun game for a toddler to play with her Mum or Aunty? 

Well, I must leave you now as my children are both asleep and I am longing to get this little number finished in time for the markets on the weekend - not to sell though! It's my prototype so I am not so keen to sell it, plus, I really want to wear it! If someone wants to buy it, they can order it and I will make more. These are just so fun to make!

(I think I exceeded my exclamation mark limit today. But in the words of my two and a half year old daughter, "I soooooooooo excited!")

Sunday 25 March 2012

A Quilted Box Full of Lace

A quick trip to the local op-shop while I was out having my turn to vote in the state election...a dangerous thing! A volunteer found me ensconced in the craft section debating over whether or not to buy something or other, and asked if I knew they have trolleys. I told her I always tell myself I won't need one, as I am just stopping in for one or two things, and always end up loaded up. 

I managed to drag myself away with just one armful of things. This cute quilted box below, with about twenty lace remnants, and a handmade doona cover with amazingly bold and bright jungle print. My sisters - it reminds me very much of our wall-hanging on our bedroom wall when we were kids. You know, the one we used to make up stories about, and imagine we were in.


I'm not sure I know exactly what I'm going to do with all the lace. I think I was thinking with my bower bird brain, my "Oooh, it's pretty!" brain. I justified it with, "I have a daughter, one of these days I'll get around to making pretty little dresses for her, and I'll use it then."

Time will tell, right?

In the mean time, any suggestions from you crafty lot?

Friday 23 March 2012

Vintage Teacup Pincushion


Happy Friday, everyone! 

I've had this tutorial on my to-try list for a while. I found it on a blog I follow - mmmcrafts. Today, I actually did it. And do you know what? I SHOULD HAVE TRIED THIS BEFORE!! It only takes 15 minutes, including time waiting for hot glue to warm up. Crazy quick and easy too. And so cute! 

I had this mini vintage teacup and saucer that I had used in my windowsill teacup succulent garden, but my windowsill is just not sunny enough. Or perhaps I was over-careful in not watering them "too often". Poor little succulents, may they rest in peace. (They did not all die, just a few).


As Larissa mentions in the tutorial, I have also found it annoying to have my round pincushions rolling away while I am trying to pin them. I am hoping this little beauty will hold still for me on its nice saucer base. 

The fabric I used was from a bundle I was given by my generous Grandmother-in-law. Funny how people give away their "maybe one day" stashes when they find someone who is right in the midst of sewing and crafting up a storm. I have also scored some lovely fabric from my Mother-in-law and my own Grandmother. Hurray for generous relatives, right?


Thursday 22 March 2012

First Sales on Etsy

My first Etsy sale ready to go into a postal bag

 Wow! A few exciting things have happened in the past couple days. But the main one for me to share with you here is my first Etsy sale! I had a visit from my lovely friend Carly who decided to buy up a few pre-made Etsy items as well as a couple custom orders. 

Custom felt 50s style dress brooch, inspired by this.


Custom cupcake, similar to one here, but puffier.

The full order in its cute little box.

I got my second order today, thanks to my lovely friend, Rach. I am excited about making the custom items she has ordered also, but they may need to wait until after the markets (thankfully she is not in a hurry).

You know what? This is not as scary as I thought. :)

Tuesday 20 March 2012

A Few Thoughts About Sewing Machines


I love my sewing machine. I really do. It is not fancy. It is not new. But I love it all the more for those reasons, I think. I am an old-fashioned gal, really. And sentimental to boot! 

I got this sewing machine for my birthday when I was in late high-school, my sixteenth or seventeenth birthday, I am not sure which. It was not new then, either. In fact, I went with my Mum to check it out from an ad we saw in the local newspaper, and we ended up buying it. It was about twenty years old then, if I remember correctly, and a sweet elderly lady was selling it because she had to give up sewing due to Parkinson's disease setting in. She threw in a bunch of old buttons, zippers, some Singer sewing scissors and pinking shears, and a few other odds and ends. It was so exciting to go home and sort through it all.

I used it regularly at that stage for a year or two, then it went on holidays for a few years while I finished uni and went into the full time workforce. I put it back into action once my hubby and I moved into our own home, to help me hem curtains and set up home. It gets used regularly now and has not failed me yet! 

Sure, it only does fairly basic stitches, but that's all I need. I enjoy hand embroidery, so I don't use the machine for that. I happen to be one of those old-fashioned people who prefers my old non-computerised sewing machine to a newer, computerised one. My sister is the same - in fact, hers is much older, a Singer she inherited from her grandmother-in-law. It doesn't even do zig-zag! But she loves it. 

Maybe it is because I am a creature of habit and not particularly fond of change. Or because I am sentimental. As much as I like some aspects of technology (ummm...hello, I'm blogging, right?), I find some technology just seems to over-complicate life. That reminds me of the start of "The Gods Must Be Crazy" movie, when the narrator talks about how in the "civilised" world, people made machines to simplify life and ended up complicating things far more...

Or maybe I'm just plain intimidated by fancy machines with one thousand and one functions. Hmmm. Probably.

What sewing machine do you use? Do you like ones with lots of bells and whistles, or a simpler machine with basic functions?

Please leave a comment below to weigh in. Thanks :)


Monday 19 March 2012

Market Preparation Progress

Just a few bits and pieces I have been making recently...

Playing with potential market set-up

Displaying my embroidery wall art in the vintage suitcase

My playful money tin

Recipe card board (for holding recipes while you are using them)

Felt apple brooch


Another retro floral clutch

Friday 16 March 2012

Live Out Loud


I took retro floral fabric with cute tiny black flowers on off-white background. 
I stretched it in a timber embroidery hoop. 
I wrote on it in a HB pencil, just in my own handwriting.
I embroidered over my handwriting with 3 strands of red embroidery floss, in stem stitch.
I used thread to hold the fabric at back of hoop taut.
I glued red wool felt over the back.
Voila.

Thursday 15 March 2012

Retro Clutch

Migraines. Hate 'em. They are so debilitating! I've had three in the past week, one this morning. Not fun.

Anyway, on a brighter note, I whipped up a cute retro clutch yesterday afternoon when the kids finally settled for their naps.


 I just LOVE this fabric. I think I picked this one up at an op-shop. Or did it come in the vintage suitcase? I can't quite remember.

I love ric rac. I love vintage buttons. And I love cute seventies fabric featuring roses in lovely bold yellow with brown and grey tones. So I am going to find it hard to part with this at the markets in a couple weeks. 

Not that it will necessarily sell, hey. Well, I have more of these cut and ready to sew...if they don't go at the markets, I know people who would love to receive one of these for a present (let's just hope they don't feel like they are cast-offs)!


Tuesday 13 March 2012

How To: Make a Felt Brooch


Today's How To is How To Make a Felt Brooch. Just some tips and ideas based on how the creative process works for me. 

Materials:
  • 100% wool felt, or wool blend felt
  • DMC or Anchor embroidery floss in a variety of colours to match and compliment your felt
  • Small, sharp, pointed scissors like those used for embroidery
  • Baking paper
  • HB or 2B pencil
  • Paper scissors
  • Bobble-headed pins
  • Crewel needle for hand-sewing
  • Brooch pins
  • Hobby fill (optional)
  • Trims, buttons, ribbons, ric rac, fabric scraps etc. (optional)
  • Ideas for designs (not really materials, but still essential!)
Method:

1. Decide on your design. (Ummm...a bit obvious but you have to start somewhere, right?) For the example, I am going to do a tea cup and saucer.

2. Get your design on paper. (Not so easy for me!)
 If you are really clever and can handle a pencil and paper, sketch your design. If you are not - get your significant other to sketch it for you!! (
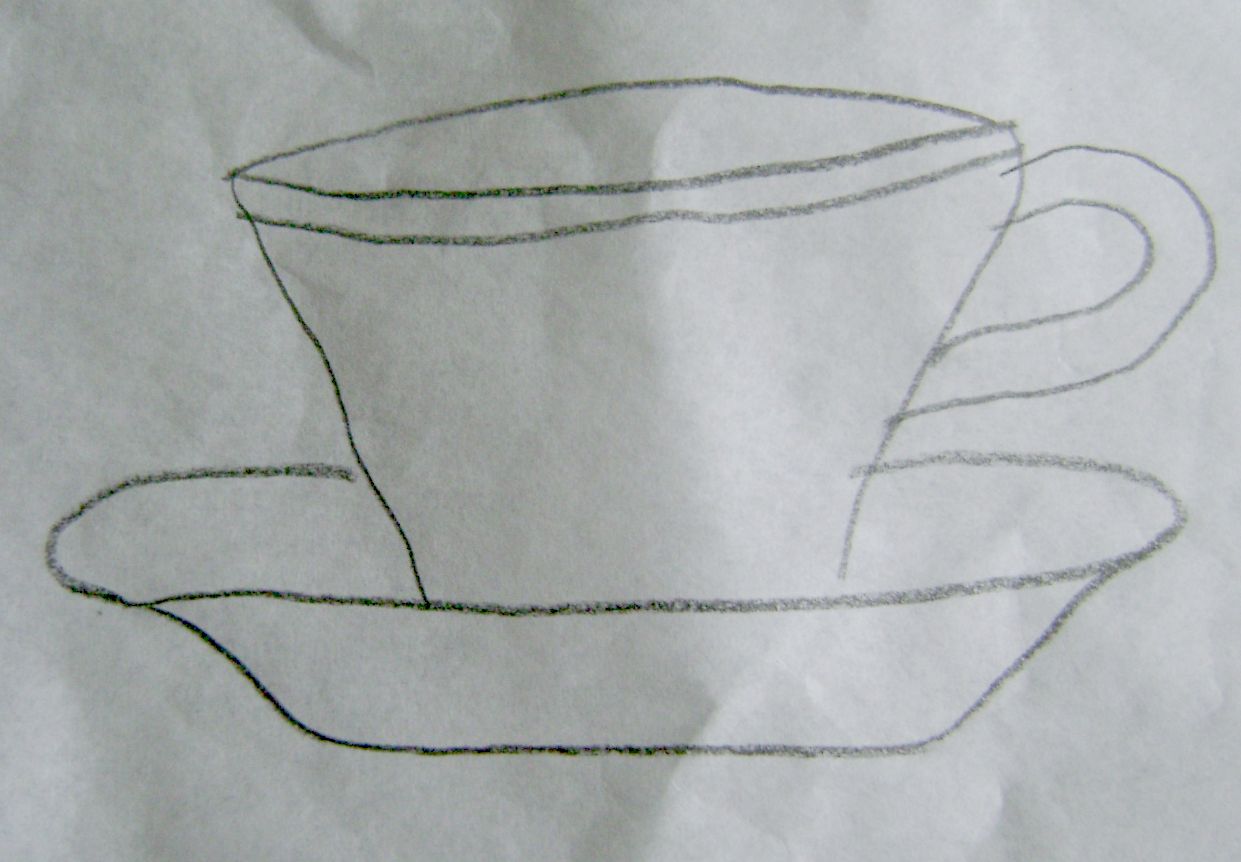
I do this sometimes.) Or you can find a clip art that has the basic shape, and use your baking paper to trace the bits you like and manipulate the bits you don't like. [Make sure of course that you don't just trace a clip art as is. That would violate copyright.] You can trace over your own drawing as many times as you need until you get the shape you like. Baking paper is cheaper than trace and more manageable for pinning to the felt later on.
If the design has several layers (e.g. an owl with a white and a black layer for eyes), make sure you trace each element that needs to be a different colour out separately. If there are a lot of bits, it helps to write inside the shape what colour it is to be.

Example:


 A couple images from Shutterstock. While I prefer the style of the cup on the left, the handle looks a bit fiddly. So I think I will do a combination of the two. So I do a trace of the elements that I like of each, and put it all together.


Although I could do this design in layers, I think I will cut it out in just one colour, and use embroidery to create the lines.

3. Cut out your design with your PAPER SCISSORS. Yep. As tempting as it may be to just pin the design to the felt and cut it out with the sharp embroidery scissors, DON'T DO IT! If your Mum ever did any sewing at all, I am sure she would have made sure you knew never to touch her fabric scissors. Treat the embroidery scissors the same. Please, just trust me. ;)

4. Pin the shapes to the felt.  Make sure you have the right bits pinned to the right colour felt...just sayin'...


Some other brooches ready to sew!
5. Use your SMALL, SHARP, POINTED SCISSORS to cut out the shapes. I recommend cutting two of the main (biggest) shape out, as it adds strength to the brooch. The small scissors are essential for this, as they are able to get into the small areas more easily for a sharper shape.


6. Now just stop for a minute and THINK. Think about which bits need to be sewn to which bits in which order. This sounds simplistic, but it is important, trust me. Think about where you want knots to be hidden. Think about where you want trims, such as ric rac or ribbon, or buttons or even fabric scraps or embroidery embellishment. Plan it all out before you sew anything. (Hint: sew the brooch pin onto the second piece of main body piece that you are going to use for the back. And check before you sew that you have it the right way up!)

7. Now thread your needle with embroidery thread and go for it with the sewing. This step assumes you have some prior knowledge of hand sewing. If you don't, please make use of your local library and get some books out on basic embroidery. Or Google it.


You can use blanket stitch to join the main two shapes together (such as in the cloud below), or running stitch if it looks more appropriate (see the strawberry). In the tea cup example, I actually used stem stitch. Other stitches that I have used here include seeding stitch for the strawberry, straight stitch for the sprinkles and stem stitch for the patty case on the cupcake, french knots for the buttons on the dress, and satin stitch for the tea in the cup. I generally use two strands of embroidery thread, but you can alter that depending on how bold you want the lines to be.

You can put hobby fill inside if you want it to be puffy (like my cloud and hot air balloon). Let your imagination run wild. 

(Please do not copy my designs, this tutorial is intended for inspirational and instructional purposes only. You can buy my felt brooches here.)

LinkWithin

Related Posts Plugin for WordPress, Blogger...