Thursday 24 May 2012

Business Card Display Board and Recipe Holder

Oh. My. Goodness. What a day! In fact, what a week it has been!! Talk about crazy, non-stop, headache-inducing busyness. *Sigh* Okay, now that I have that off my chest, time to talk about something I've made recently.

I have a beautiful friend who very sweetly and trustingly puts custom orders in to me. The conversation goes something like this:

Friend: Candy, I'd like to order something from you, and please make sure you charge me enough, and it doesn't matter when you get it finished, and if I love it I may order more...
Me: Okay, what would you like me to make?
Friend: A fabric-covered canvas roughly yea big, you know with the diagonal ribbon and button effect? For displaying my business cards at wedding expos and the like. And a recipe-holder like you have, but to hang here, in this one little spot in my kitchen that I can put something on the way, and all girly and over-the-top like I am, pinky, you know...
Me: Sure, well I can bring some fabric swatches over for you to have a look at.
Friend: Oh no, you choose, whatever you choose will be gorgeous, I'll just leave it up to you!
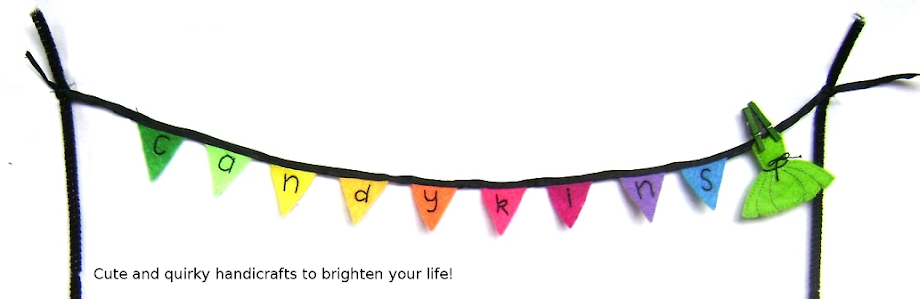
Me: Well, do you want some felt bunting spelling out your business name on the display board?
Friend: Oh yeah, maybe? Up to you, whatever you think. And no rush, seriously, take a few months if you like, just whenever...and make sure you charge me enough so that you can make money from it! 

Isn't she beautiful? I love her to bits.

Anyway, here is the outcome of the above (somewhat accurate, if my postnatal memory is serving me correctly) conversation.

Recipe Holder

Close-up of the fruit themed buttons adorning the pegs

Business card display board


Close-up of felt bunting

By the way, there is a cool story about the buttons on the business card display board. I did a mock-up of the ribbon placement with string, to get an idea of how many metres of ribbon I would need to buy, and to count the junctions to know how many buttons to buy. But I forgot to check how many rows I ended up with, and I forgot to count the junctions!! Once I got to Spotlight, I searched through the rather meagre supply of buttons for blue ones - I was going to do the ribbon in pink, but there were none that matched that colour. So I switched my plan, and went with pink buttons...the ones I wanted only had one or two buttons in there. Then I found these, that had a flat back but a nice curved top, they were the only pink buttons that had enough in the tube to even come close to sufficing. I counted, there were 39 buttons. I thought, "I hope there will be enough!"

When I got home that afternoon, and attached the ribbon, then counted the junctions, guess how many? Yep, THIRTY-NINE! Perfect! (A big THANK YOU to God for that one!)

Hope you love it, dear friend!

Friday 18 May 2012

Friday Fun: Kimono's Townhouse

Can you believe it is Friday again? Hooray!! 

Just because Fridays are supposed to be fun and laid-back, I thought I would share some fun with you today. 

Have you heard of Kimono's Townhouse? I have been reading it for about a year now, I found it via Frankie

It is a wonderfully unique comic strip about ponies (think My Little Pony) living in a townhouse, updated each week. You might wonder why I am sharing about a comic strip on a craft blog. I have a perfectly good reason - it's because creator Dava Butler is a craft whiz!! This comic strip is photographed rather than drawn. Yep, that's right. Dava sets up each scene, often creating incredibly miniscule props to support the dialogue. It is really incredible work, but you kind of forget that because you get sucked in to the story and the characters and just enjoying the wit and craziness of the actual comic. 

Anyway, I like it. And I thought maybe you would too. 


[Pics are small due to copyright issues - click on them and they will take you to the original pages. Images  from www.kimonostownhouse.com]


Thursday 17 May 2012

MadeIt Front Page - Woohoo!

Ooooh, look at this. I MadeIt to the front page. Can you spot it? Can you? Look third row down, third from left...


Wednesday 16 May 2012

Op-shop Haul

Okay. So this was a while ago. Maybe two months ago, I walked into the local op-shop on a quick trip out by myself, and as usual, I went straight to the craft and sewing supplies section. The pickings are usually fairly slim, but it's always worth a look, I tell myself. I had to work hard at keeping my cool, because I found the box of sewing patterns was filled to overflowing with exactly what I am always looking for and rarely find - amazing vintage patterns for kids and for me, from the 50s through to the 70s. I think they were all from one particular donor, who dropped them off all at once, and they were put out all at once, and I actually happened to make it there at the right time to snap them all up (thanks, God!). I bought TWENTY-ONE of them. Mmmhmm.

Seriously. I was so excited about these. I still am, I just have not even begun to find time to actually SEW any of them. But thanks to Cass from Cass Can Sew, I was reminded of the great haul when I read her blog post today.

To be honest, I have not had the guts to go through each pattern yet and see which pieces are still in tact. However, I love the gorgeous illustrations on the covers, even if the patterns are not there! Unfortunately, some of the covers are not in the best condition. But still, they make me gasp with their gorgeousness. 

There are too many to have all as separate pics, so here is a collage of them: 

 And close-ups of just five of my favourites:


What great finds have you scored at op-shops lately? I would love to hear about them!

Monday 14 May 2012

Gift For A Teenage Boy


Does anyone else have a hard time coming up with gift ideas for boys? Specifically teenage boys? 

My teenage brother never helps me out much, just grunts "Dunno" whenever I ask what he wants. So this year for his birthday, I did not ask. I took Mum's advice and made him an iPod case. He is into all things farming, (when I asked his favourite colours, he said yellow and green as per John Deere farm machinery) so hubby suggested I make it out of leather. But considering I do not have the equipment, materials OR skills required to do leatherwork, I decided brown felt was the next best thing.

The "T" is a bit wonky. Oh well. I made up a new design, with a pocket for headphones (the small 'bud' kind that he uses), with the one elastic band to be used for both button closures.

I hope he likes it!


Sunday 13 May 2012

New Mothers' Day

Happy Mothers' Day to all Mums, Grandmas, Nannas, etc. I hope it has  been a special one. I spent the day with my hubby and kids, which was just lovely, despite everyone being just not quite well. Unfortunately, my own Mum was in bed with the flu, so we had to cancel our visit to her :(

I found some time in the last couple days to complete some little cross stitch bibs for the new bubba girls born to friends and family in the last few weeks. I am counting on the new Mummies to be too busy with their tiny bundles of sweetness to see this post. 

In the past, when I have done counted cross stitched, I have worked very much to a pattern, meticulously counted to get placement right, and generally been too scared to branch out. This time, I knew that would put me off even starting, so I just got right in and stitched the girls' names first, then worked out what else I was going to put on the bib with what space I had left. 

I took the general pattern for the girl with balloon from an odd ringbinder full of collectable cross stitch and embroidery patterns from the 1980s that someone had given me. I tweaked the design and the colours to suit me, and I think it turned out quite well. 


Are you a stickler for patterns, or do you like to wing it? Or are you somewhere in between?

Oh, and aren't these names just gorgeous?

Saturday 12 May 2012

A Win!

Hooray!! I won something!! I rarely win things. *super happy dance*

The lovely Donna, of Donna Duncombe Designs, had a giveaway over on her blog this week. And I happened to win the digital prize - I got to choose something from her digital section of her Etsy shop. So exciting! I chose a pack of digital scrapbook papers, the Daydreamer pack.


Thanks to Donna, I have now upgraded my blog background. I have been itching for a change, I really just chose the previous textured paper look rather quickly when I was trying to get set up last year, always thinking I would change it eventually, but the last time I updated the look of the blog, I couldn't find anything I liked better. So this was a rather lovely little surprise. 

I am working on being able to use the single continuous design, rather than tiled as it is at present, but my Blogger and I are not getting along when it comes to that issue at present. We will work it out. :)

Also, considering going back to a white background for the posts...what is your opinion? Is it too busy behind the main text? Would it be better with white?

I am still itching to do a hand illustrated header, but that will have to wait for now. Too many new orders to fill!! (A good problem to have, but I must get cracking on those orders).

Thanks to Donna for the lovely giveaway. Donna also creates funky crochet hooks - you should totally go check them out.

Mummy and Me Oilcloth Aprons

Wow. It has been another crazy week in our household, what with sickness and exhaustion. Do you ever feel like you are just always at least one day away from catching up on everything? I just never quite get caught up. A common dilemma, I guess.

I have been trying to keep up with my making, alongside all the normal stuff of life. I just have not managed to blog about it for a few days. So...here's a little update of just one of the things I've been working on.

Remember the Kids' Oilcloth Apron I blogged about a couple months ago? I mentioned then that my friend had put in an order for matching aprons for her son and her. I have *FINALLY* made them. Sorry it took so long, my friend!


I learned a lot while making these about what a difference the quality of bias tape can make. Not a fun lesson to learn. As much as I would love to keep things simple and buy as few gadgets and gizmos for my sewing as possible, sometimes I think it would just be easier if made my own bias tape. I know I can do this without a bias tape machine, and have done that before. But...part of me just keeps saying "It would be quicker and easier with a bias tape maker". Arrrgh. Maybe I will relent and request it for my birthday.

Wednesday 9 May 2012

Looky here!

Just had to share the news! Candykins Crafts, and more specifically, yours truly, has been featured on the wonderful Caheez Designs blog. You can find it here


Monday 7 May 2012

Dress Up Doll Brooch

Completed Dress Up Doll Brooch Set
 
Hi there, friends. Remember me? I feel like I just do not get to blog as often as I would like to lately. Anywho, here I am on Monday evening, finally getting to a post I have been wanting to do for a few days. All about my latest project which I have just completed - a custom order for a felt Dress Up Doll brooch with four interchangeable 1950s style dresses. The request was for dresses in hot pink, lime green, purple and one other colour that I could choose. The concept is based on my Washing Day and Dress Up Doll set, but without the necklace. This actually made it a lot more versatile, as I did not have to make the dresses match each other (even though they kind of do anyway).


Original concept sketch and watercolour for Dress Up Doll custom order


I was really excited to make this set. I just love making these little vintage-inspired dresses, they are so much fun. Plus, the details are really satisfying to complete. This time, I plaited the embroidery floss for the belts and bows, used french knots for buttons, stem stitch for pleats and running stitch to stitch the two layers of felt together. Each dress is two layers of 100% wool felt.

I got a little thrill when I heard back from the customer after she received the brooch. She said: "It is perfect! I love all the outfits and the detail is just right. Thank you again for making these for me. I'll be wearing them to work this week to show them off."

Mmmmm...satisfied customer = satisfied maker. :)

Thursday 3 May 2012

It's the Little Things...

Belinda aka Moonmum blogged today about "Small and Random Things". I love this concept - taking a moment to reflect on the little things in life that are making me "quietly contented" (as Belinda says). Doing that right now, here is my list for today:
  • Beautiful Autumn outing to the park with my kids and some friends
  • Watching my 6 month old son exploring/crawling on grass
  • Drinking lovely tea from my favourite tea cup passed down to my from my grandmother
  • Having an unexpected free evening to create
  • Hearing from a new friend that she wants to do a blog feature on Candykins Crafts
  • Making some fun tiny felt dresses for my latest project
What are your small and random things today?

Wednesday 2 May 2012

Child's Artwork Embroidery

A couple weeks ago, I got a custom order request from someone in the US, wanting 2 of her daughter's drawings embroidered and posted in time for Mother's Day. I was rather excited to have my first international order, and wanted to do it even though it would be a bit of squeeze, time-wise. Thankfully, all the custom orders I have waiting to make are very understanding friends who have said 'whenever'. I am working on timelines with each of those, and have given myself finish dates, and I thought I could pull this off...

The drawings/embroidery artworks ended up being a bit more time-consuming than I anticipated, but I had a lot of fun with them.

Photo of original drawing


My finished embroidery artwork

Photo of original drawing
My finished embroidery artwork

These are so super dooper fun. I really enjoy them!!! [If you want me to do a custom order for you for Father's Day or a birthday, just email me at candykins.crafts@gmail.com, or visit my Etsy store and request through there. Thanks!]

Tuesday 1 May 2012

Let's Meet: Amy C Lund


Today, I have the pleasure of introducing you to an amazing artisan who happens to be a new friend of mine. Meet Amy C. Lund, Hand Weaver.

Thank you, Amy, for joining us today. First of all, could you please tell us how you got started as a hand weaver?

I became fascinated with hand spinning at an early age, bought some wool, fixed up a spinning wheel and practiced. Of course, I had to learn what to do with the yarn I created, learned first to knit, then became interested in weaving, fascinated with textile history and technology.

How long did it take before you felt comfortable handling the loom?

I started young in my adventures into weaving with a class at Historic Slater Mill in Pawtucket RI, the first water powered cotton spinning mill in the country. I continued to foster my interest and study of weaving with history and technical books that I could find, and applied my practical knowledge on a few projects over my schooling years. 
After college in the late 80s, I found an apprenticeship/internship at Hancock Shaker Village Museum in Pittsfield, MA. This solidified my knowledge and encouraged me to get a graduate degree in the field of Textiles at University of Rhode Island, with focus on Conservation and History. I worked briefly in museums, but I missed the actual weaving experience. So, I sought work with other artisans to understand some of the business-side of craft, and made the leap into full-time myself in the late 90s.

What do you love most about hand weaving?

I love the process, watching everything fall into place, coming together with pattern and texture on different levels.

Could you please describe how the artistic process flows for you, from initial concept design to completed product? 


I often think of what I want to make as an object and what qualities I would like it to have, then determine the fibers, materials, and then gravitate to colors and patterns. I try to reach for the point where I think form and function should meet. After sketching the general design and colors and working out the determination of number of yarns, the finished size, quantity I want to make, I dive into the actual process step by step from winding the warp, beaming on the loom, threading and tie up to actual weaving of the material. The processes of washing, edge finishing with fringe or hems, pressing, labeling, tagging, and pricing for sale completes each piece, turning it into something useful beyond yardage. Lastly, without marketing or display an item is not really done until it is in the hands of a customer.

What is the biggest challenge for you in the artistic process?


It’s all a balance and an art as much as concrete counting and placing of threads. Sometimes it’s too easy to fall into the trap of over-thinking a project, just as much as it is easy to under-think it. While it takes some conceptualization to determine some of the details of a project, sometimes the fun is in seeing what will happen. Some of this comes from practical experience and some from artistic insight.

What does an average day look like for you?
Some days I am a shopkeeper, some days I can be an artisan extraordinaire. I find that I can spend a lot of time on the marketing and business, after all making isn’t worth much if it doesn’t sell. Some days it’s easier to concentrate on one aspect over the other, too.


I usually start and end the day early on the internet, checking messages, online visibility, promotional aspects, and research. When I get in to the actual physical Studio & Gallery, I first have to open the shop to be ready for any customers, before I can concentrate on anything, either paperwork, display, finish work, or actual weaving and creativity in the studio. There is always something to do, and then things that come up along the way. This sometimes means getting items ready for sale or shipped, or working varying stages of projects in process, or just selling and talking to customers who stop in.

Some days I can get 4-6 good hours of weaving and focus, some days it’s harder, such as weekends when there might be more customers. It takes a lot of flexibility and having several projects at varying stages, or requiring varying levels of concentration, to work on to suit every mood or moment. It’s a discipline to work when you don’t feel like it, as much as it is to put it aside to get other things done.

Do you prefer the experience of selling in your bricks and mortar shop, or online, and why?


Working in the B&M shop is great for the personal interaction with the customer. Sales can happen immediately, or be built up, right there. Sometimes I get feedback on other perspectives of my work as well like design ideas, and practical uses. It is also a full-time job, requiring the stability and discipline for reliability of being open regular hours whether for 1 or several customers who might come by. There is sometimes an ebb and flow to the days when visits can interrupt the artistic creative and working flow, and yet being in a space completely oriented to creating and working keeps the concentration higher when there are few distractions.
Online, I find that I have to get creative in other ways, since I may not see or know my customer directly, or even who is looking at my work, how they see it. I also have to spend a bit of time trying to learn and figure out the technical aspects. It’s so easy, though, to be able to work some days in your pajamas or to make a sale while sleeping or doing something else!

Bottom line to me is that each outlet depends a lot on the groundwork to prep a sale for both, whether it is dusting and vacuuming or straightening displays in one to tweaking tags, images and descriptions in the other. Working in each, I think, compliments and strengthens my approach to the other.


Any advice for those thinking of pursuing their artistic dreams?

Do your research, but also do some work. Eventually you just have to try and figure out by experience what works. It can be a gamble, but try to set reasonable goals for yourself.

Where can we see more of your work?

I’m out there in a lot of places on the internet, though I focus on some more than others.
www.amyclundhandweaver.com is my main Studio & Gallery page with links to my many others.
www.etsy.com/shop/aclhandweaver is my main online sales venue
www.facebook.com/aclhandweaver is my place for current events and updates for both the B&M Studio & Gallery and the online Etsy shop.
www.aclhandweaver.blogspot.com/ Is where I occasionally post longer discussions that come over me about the intellectual and artistic side of weaving life.

I’m also on Twitter, Flickr, MySpace, Tumblr, LinkedIn and Pinterest.
Thank you so much, Amy, for sharing with us! 
[All photos in today's post are courtesy of Amy C. Lund, Hand Weaver.]

LinkWithin

Related Posts Plugin for WordPress, Blogger...